Back in February, as I lay in bed recovering from a particularly difficult pregnancy and delivery, I came across this post by ClassyClutter.net. 
 I stared at her beautiful pantry often and started dreaming of ways to get my own beautiful pantry. I began looking for supplies and swapped ideas with my super organized friend, Charity. She said she would help me when I was ready to tackle my pantry and I finally started believing that the perfect pantry of my dreams could become a reality.
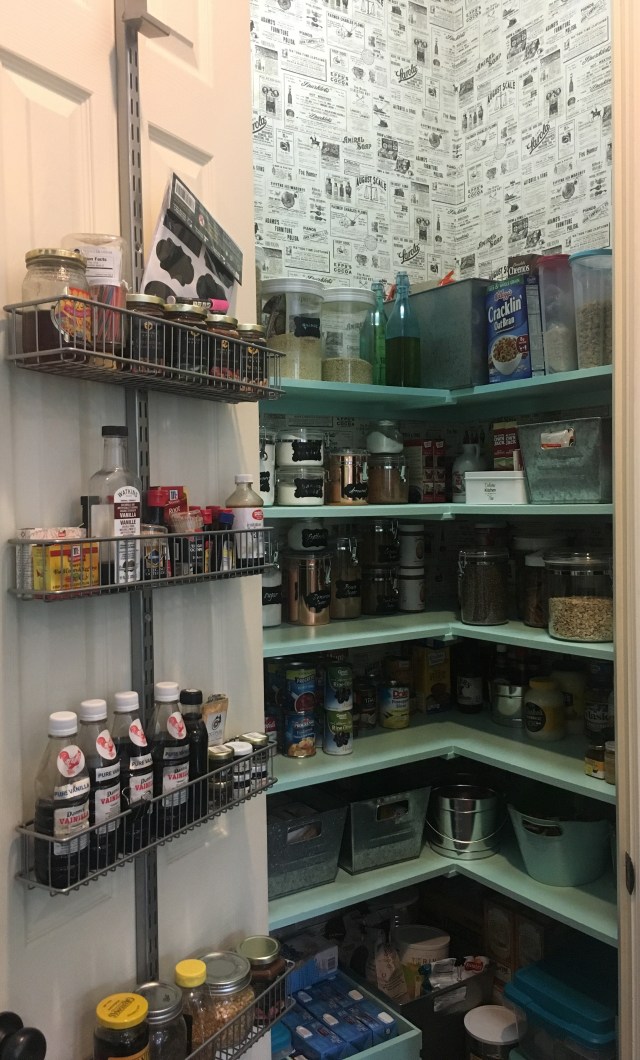
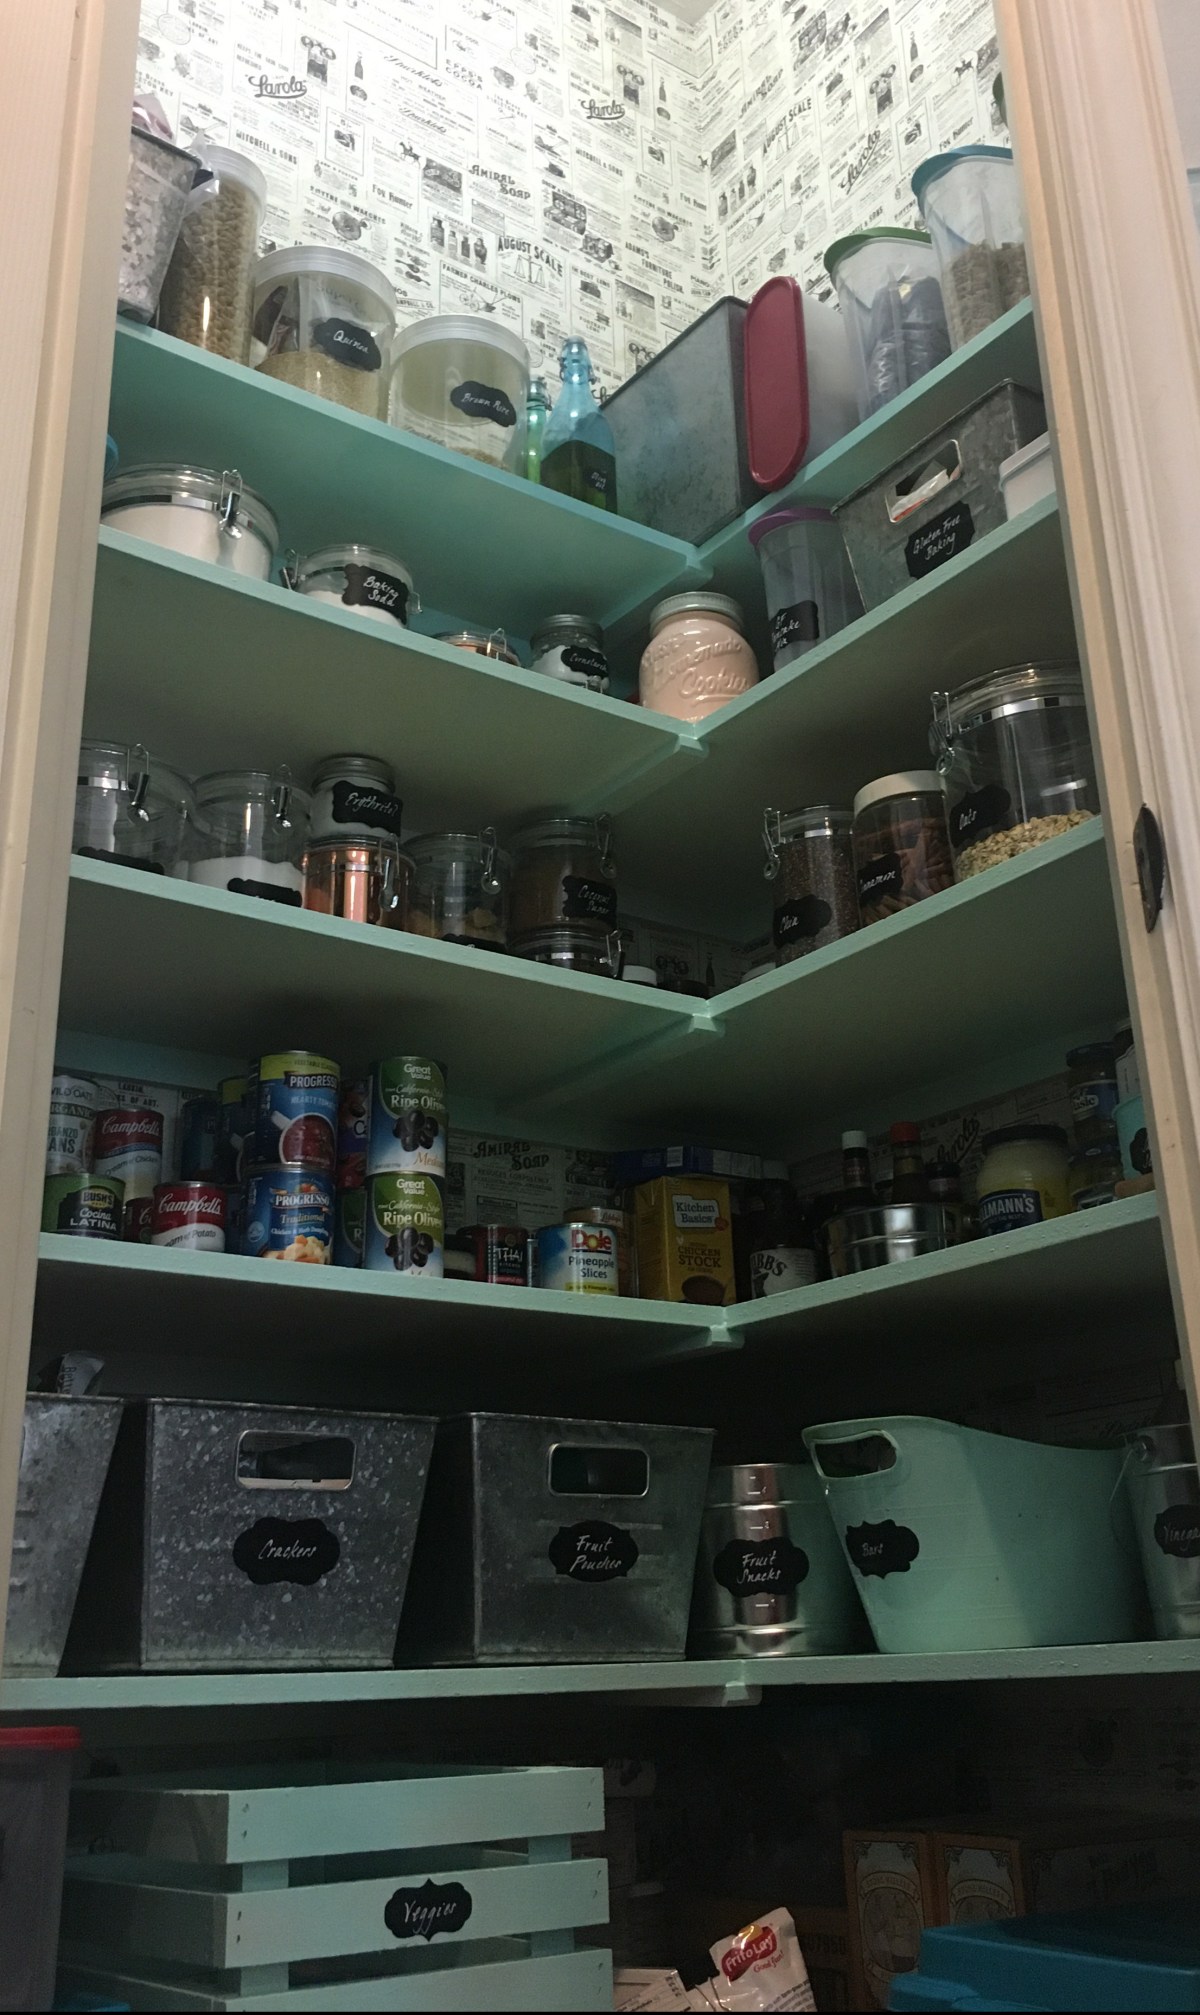
One of my favorite things about Classy Clutter’s pantry was the pretty wall. Even though they provide no real function, I knew I wanted pretty walls in my pantry. Classy Clutter sells the vinyl decals that she used on her wall, but I had a different vision in mind of the look I wanted.
In my search, I came across quite a few wallpapers that had an old, vintage newspaper feel and I fell in love with this one: I actually ordered a roll from Home Depot for $73.42. I didn’t understand that the double roll they said they were sending didn’t actually double the measurements in the description. It wasn’t until I received my roll that I realized I would actually need 2 “double” rolls. And I wasn’t prepared to spend nearly $200 just in wallpaper for my tiny pantry. So, I returned the roll to Home Depot.
I then tried searching for that brand of wallpaper online to see if I could find it cheaper, and I did. I found a coupon for a discount at Steve’s Blinds and Wallpaper and was about to purchase it from them, but then thought I’d try to see if they might be willing to sponsor this blog post and YouTube video makeover and to my great delight, they did sponsor us with 2 double rolls of wallpaper! (THANK YOU!!)
(We do not receive compensation for purchases made on their site.)
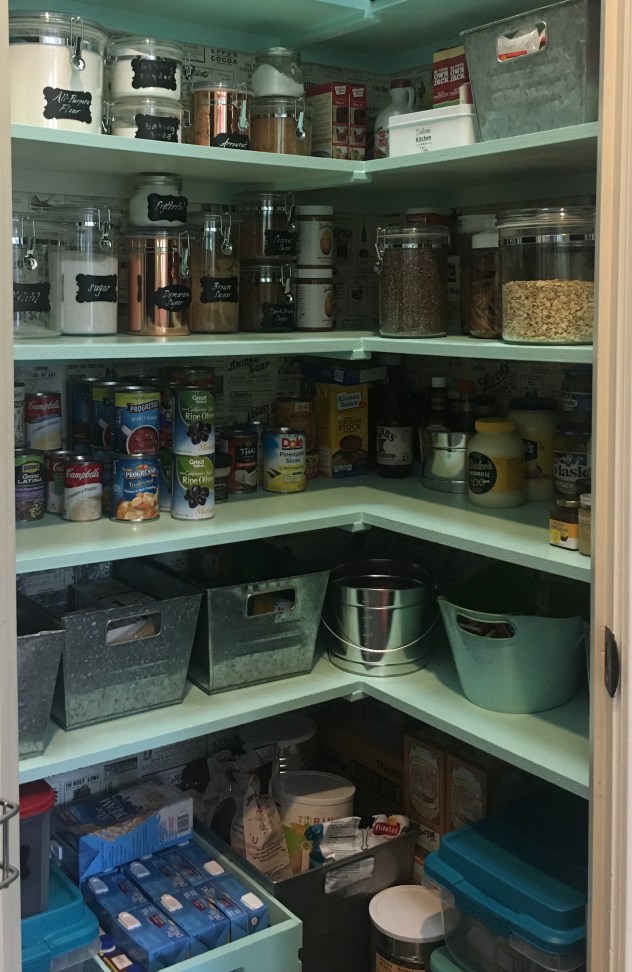
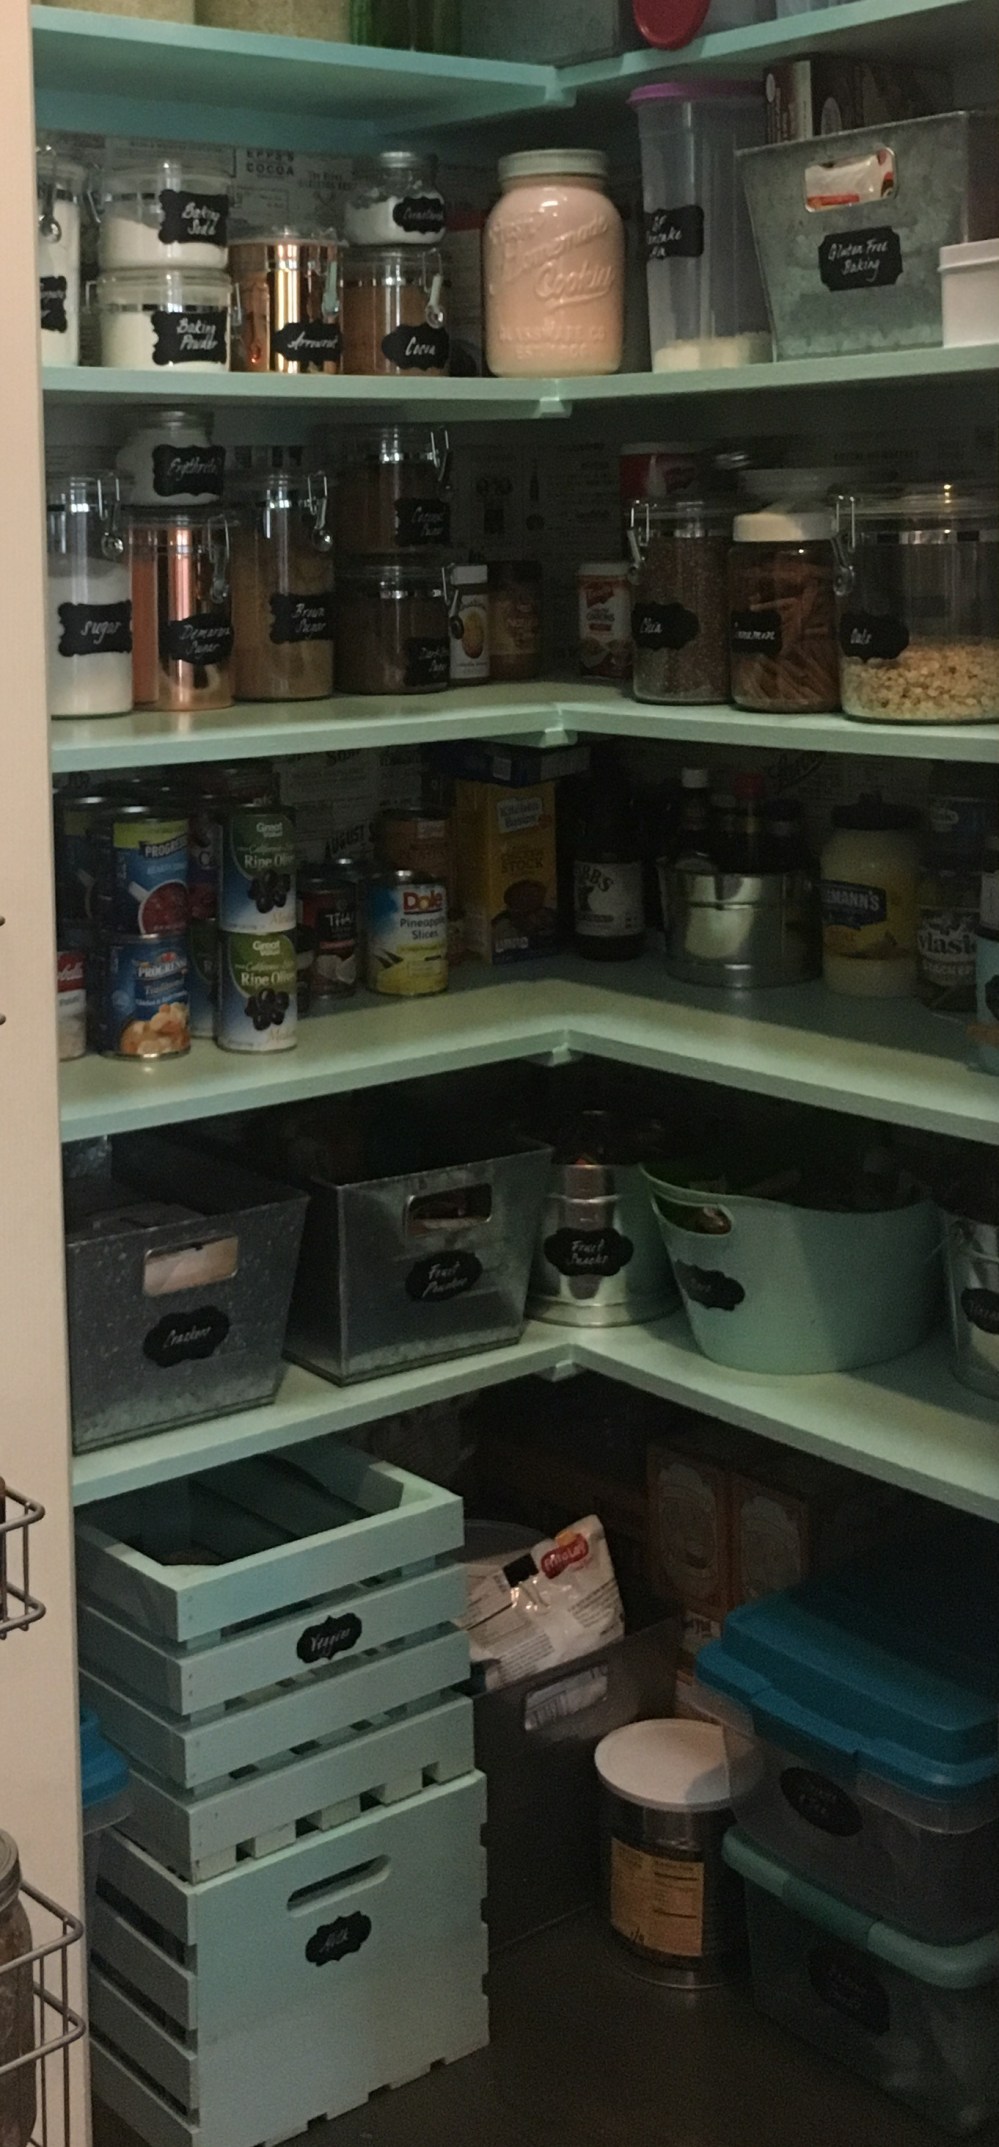
After searching for pretty things, I accepted the fact that as much as I wanted my pantry to be pretty, it would never stay pretty if it weren’t highly organized. I’m an all or nothing sort of person and I knew I needed it to be über organized for it to stay organized. Otherwise, it would all go to crap. I loved the containers that Classy Clutter used, but in my postpartum condition, if I couldn’t order it online with free shipping, I wouldn’t be buying it. I already had quite a bit of storage I had accumulated over the years, but for most of the rest, Amazon came to the rescue. There will be a list of affiliate links at the bottom of this page with items I used. I also did make a Wal-mart run for the largest bins and one of the wooden crates. The other wooden crate came from Home Depot when I bought the spray paint.
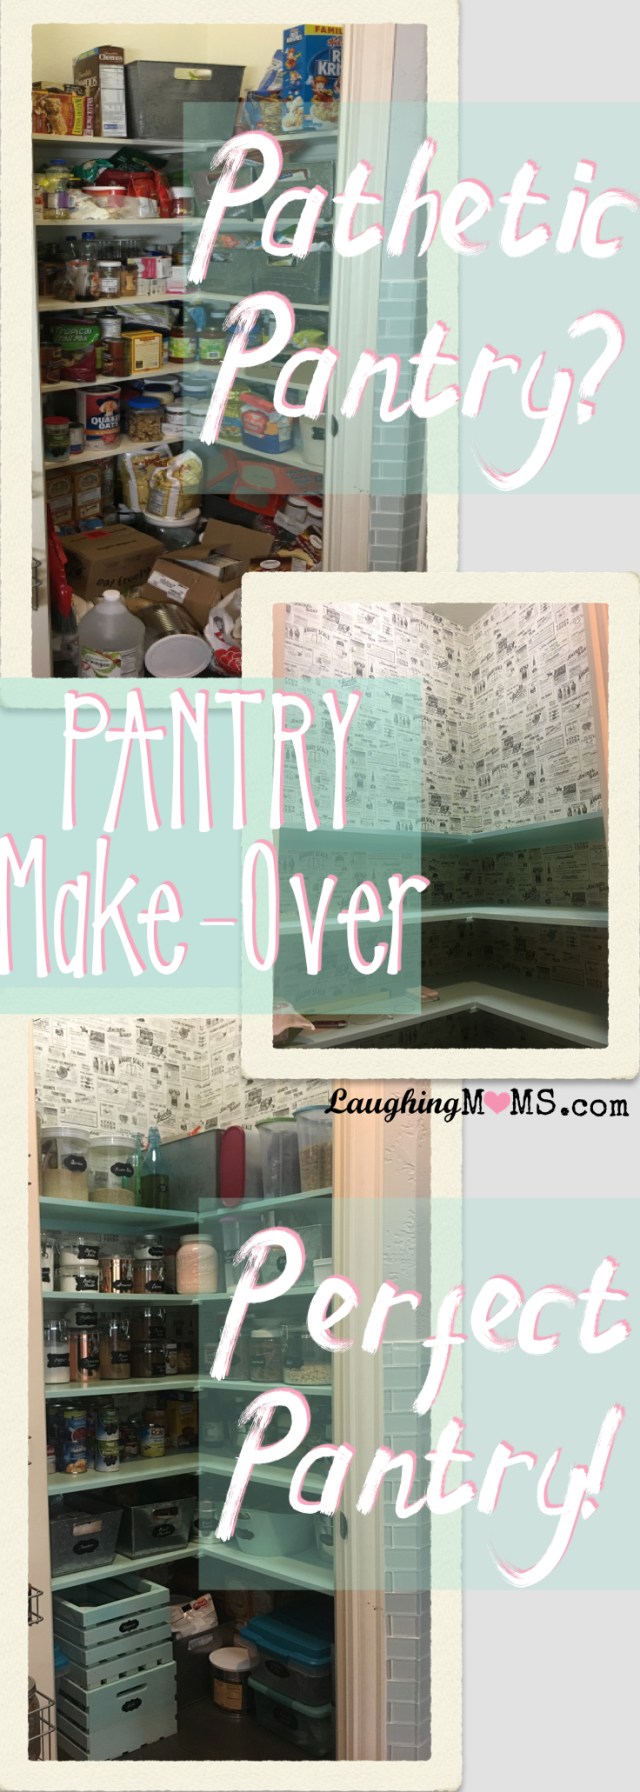
After a little more than 3 months of fantasizing about my perfect pantry, I FINALLY began the process. This is what it looked like when I started. 
Mind you, this is not for the faint of heart. It is indeed a PROCESS. I began the transformation on May 9th and finished with all the little details (labeled containers) on May 22nd.
13 DAYS! Nearly 2 WEEKS!! It was a solid week and a half of living with the contents of my pantry cramping our style. Every surface area of my kitchen––counters, floors, and breakfast area––were covered. I thought my husband was going to lose his ever-loving mind. But, fortunately he endured the process rather patiently.
Here are photos along the way:


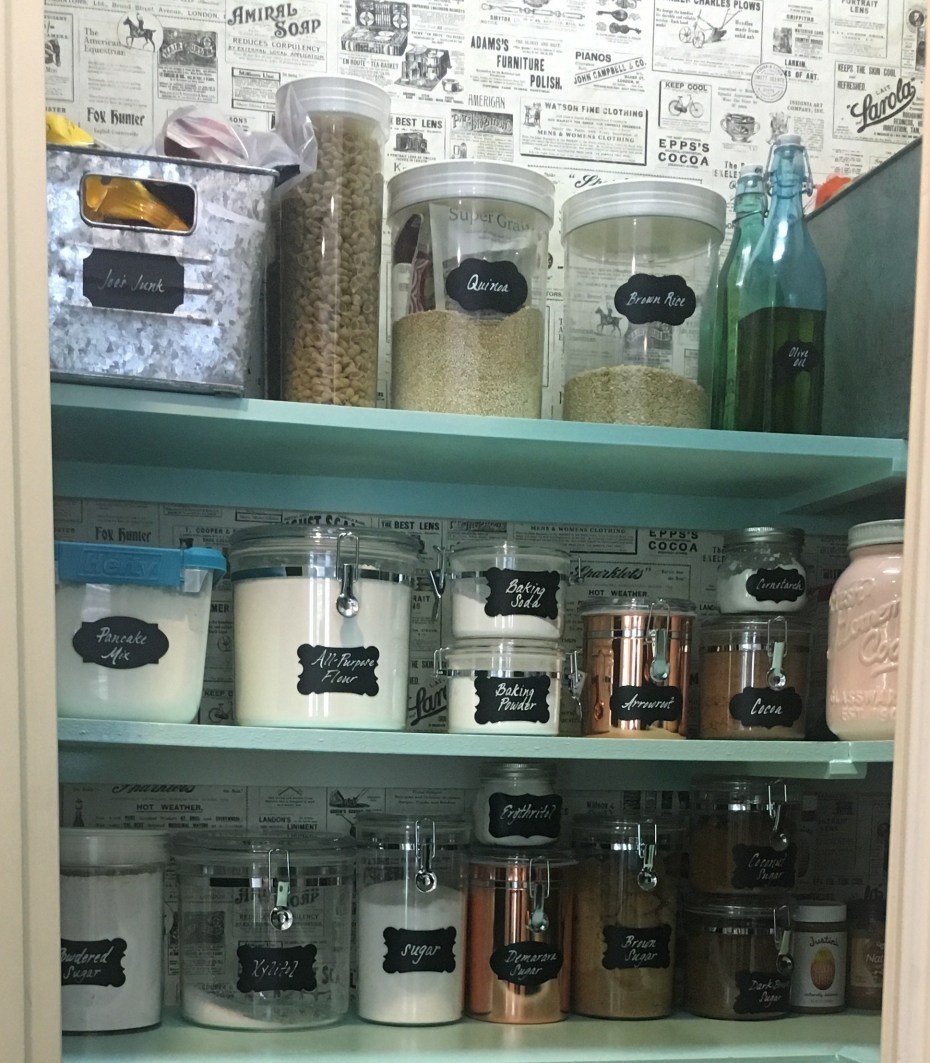
My husband thinks my handwriting looks like a pubescent boy’s handwriting, so I enlisted Charity’s help again on labeling my containers. The vinyl chalkboard labels we used are listed at the bottom of this post. They came with 2 chalk pens, a pink one and a white one. Charity wrote all my labels with the white chalk marker. 

I loved the glass canisters used by Classy Clutter, but I worried about my kids handling them. I used a mix of clear acrylic, copper, plastic, & metal tubs. Links at bottom of post.
So, how did I obtain PANTRY PERFECTION?? Here’s a video with more details:
I’ll also tell you my step-by-step process below:
- Remove every single piece of crap that is currently in your pantry. (Before this step, I was unaware that I was growing my own onions. They were not good onions that you would ever want to eat, but they were growing.)
- Take some deep breaths as you see the contents of your pantry take over every inch of space in your kitchen. Claustrophobia is a possibility. But if you can push through the pain and anxiety, you will be richly rewarded with the finished product.
- Wipe down the shelves, walls, trim, and floor in the pantry. You will likely have some weird goo stuck on your shelves. Baby wipes work wonders.
- Protect surrounding areas with plastic drop cloths and painters tape.
- Paint pantry shelves. I opted to spray paint mine which was part genius and part idiotic. You may want to refer back to step 4 here, and make sure you protect the surrounding areas with plastic drop cloths to avoid the idiotic part. I DID use plastic drop cloths, but the paint literally settled all over, up to about 12 feet away from the actual pantry. I did not cover that much of the surrounding areas and then had to scrub the paint mist off of my wood floors. But they hadn’t been mopped in months, so we’ll just pretend that was a win.
- After shelves are dry, use painter’s tape to tape off shelves and trim before painting side walls. I already had a black satin finish paint on hand from a previous project and used that. Pull the tape off while the paint is still wet. I actually ran out of painter’s tape and my paint dried while waiting for new tape. This sucked. And if you look closely at my trim, you will see where the black paint peeled off with the tape in places. Bleh. BUT, one thing I did do was use painter’s caulk along the edge of the painter’s tape where the wall met the ceiling. This prevented the black paint from seeping under the tape because I have textured walls and ceilings. Doing this allows for a nice, clean line. If you don’t do this, especially with a dark color next to a white ceiling, the bleed over will be obnoxiously visible. I just squished some out of the caulk tube and used my finger to rub a line at the seam of the tape and the wall.
- While waiting for my walls to dry, I started sorting through the craptents, er… contents, of my pantry that were all over my kitchen. I threw away anything that was growing, as well as expired items (2012 wasn’t THAT long ago, was it?), I combined duplicate items where possible, and I started organizing everything into piles. Canned goods, cereals, baking items, kids’ snacks, hubby’s junk food, etc. I (by I, I mean Charity) washed and dried the containers I had bought and started trying to match up containers to the different piles. Some were easy (cereal in cereal containers), others, not so much. For instance, we transferred the tapioca flour to 3 different containers before it found its final resting place. We first chose too small, then too large, then finally just right. This sorting/organizing step did help to alleviate the stress of the pantry mess, but it wasn’t that much better in the day-to-day scheme of things. Everything was still out of its pantry home.
- Find a really good friend. If you don’t have one, I’m really sorry, but steps 1-7 were done in vain. Just throw everything back in your pantry and cry. If you do have a really good friend (this could also be a spouse. It wasn’t a spouse in my case, but it could have been. Except he was at work, trying to pay for the containers I bought to organize the pantry, so I really needed a good friend.) Charity to the rescue (her name is quite apropos). She came to help me install the wallpaper. And these are the supplies we needed:
- A
goodgreatwonderful friend - Wallpaper sufficient to cover the walls being papered (DOUBLE roll basically means nothing. Well, it means stores will charge you double and send you one roll that they call a double roll. Read how much square feet the wallpaper will cover and determine how much square feet you have to cover.)
- Wallpaper paste. Our wallpaper was prepasted, but we still had to use wallpaper paste to not be paranoid that the wallpaper would fall down at some future date after all the pantry contents were back in place. (*shudder at the thought*)
- Paint brush to apply wallpaper paste.
- Paint tray into which you’ll pour wallpaper paste.
- Large bowl full of water.
- Large sponge. Because even though we opted to use wallpaper paste, you still have to wet the prepasted paper to make it pliable enough to hang on the wall.
- Baby wipes. These should just be on your supply list for life. They clean everything. We used them to clean all surfaces before painting and papering, as well as to wipe up the excess wallpaper paste and water from wetting the wallpaper.
- Wallpaper spreader thingy. It’s kind of like a plastic trowel. I bought it at Lowe’s in the wallpaper section, which was a tiny little end cap sort of display. I had putty knives I probably could have used, but I really liked the size and grip of the wallpaper spreader I bought.
- Utility knife. I had some rusty ones at my house but opted to buy a nice new one, and I’m glad I did. You want to cut the paper as cleanly as possible.
- Measuring Tape.
- Level (I had a long one for the large empty space above my shelves and my iPhone level for the small spaces between shelves.)
- Pencil.
- Ladder.
- A
Neither Charity nor I had ever installed real wallpaper before. (Someday I may finish a post about “wallpapering” my guest bedroom with aluminum foil. But aluminum foil is not like real wallpaper.) I read a lot before hand and watched some videos which were terrible, and figured if those people could do it, I could, too. So, this is exactly what we did that we found worked. Before we actually started cutting and hanging paper, I sweet-talked my hubby into drawing lines on the walls for me.
To make sure you’re hanging your paper straight from the start, you have to measure a level vertical line on the wall.
They recommend drawing a straight line .5″ less than the width of your wallpaper. For instance, my wallpaper was 20.5″ wide, so we measured 20″ to the right of the starting corner. We made multiple pencil marks at 20″ away from the corner and used a level to connect those marks and draw straight vertical lines. We did this from the ceiling to the floor. We did it again 20″ to the right of the second corner we were going to be papering. And by we, I mean my husband. So our vertical lines were already in place once Charity and I began actually papering the walls. The reason the lines are .5″ less than the width of your paper is because walls and corners aren’t always straight. So, you line up the right side of your paper with the level vertical line and smooth it out on the wall. This will give you the .5″ excess amount of paper that overlaps the wall to the left of the corner. You will cut down the corner with the utility knife to cut away that .5″ excess and you are left with a nice line down the corner (that follows the curves and imperfections of that corner) and a straight edge on the right side.
To start papering, they say to cut your vertical strips 4″ longer than the space you’re covering. 2″ excess at top to cut off and 2″ at bottom to cut off. We realized this amount ended up being wasteful for us and the pattern we used. We had so many vertical cuts because of papering between the pantry shelves that it was too much waste. And we actually RAN OUT of paper for the bottom right corner and had to DIG IN THE GARBAGE for scraps that we pieced together to complete the pattern. You would never know it to look at it, but there are like 50 small cuts and scraps in the bottom right corner of my pantry. So, the point being, you may not actually need 4″ of vertical excess for every strip you apply. I would have added maybe 1.5″ to 2″ of vertical excess if I had realized that would be ok. When we got to the end of our project and realized we were running out of paper, we were cutting the paper sometimes only 1/4″ longer than the space to be papered.
Charity cut and wet the wallpaper strips and carried them to me in the pantry. If you read about “booking” your wallpaper online, this particular wallpaper said it did not need anymore time to book than going from the wetting station to the hanging wall. So, we did not “book” our wallpaper. But if you need to, it means that after you wet the wallpaper, you gently fold the sticky side in on itself to allow the adhesive time to get sticky. You don’t want to crease your paper if you do this and you don’t want to fold the sticky side onto the patterned side of the paper. Read the directions for your specific wallpaper.
While Charity was cutting and wetting the wallpaper, I was applying wallpaper paste to the walls and hanging, smoothing, and trimming the wallpaper. The reason I used wallpaper paste was because on the first couple of pieces, I didn’t use wallpaper paste. We only got a couple of pieces up the first night we worked on hanging it. That was a Saturday night. We let it sit all day Sunday and came back to finish hanging it on Monday. When we checked the pieces we had hung on Saturday night, there were large places where the paper hadn’t stuck to the walls at all. I NEVER wanted to empty out my pantry contents again, so I decided that just to make absolute sure the paper would stay put, I’d also use wallpaper paste. I added paste under the loose edges of the already hung paper and started brushing the paste onto the wall area about to be covered with paper, one section at a time. We thought that perhaps, since we were using wallpaper paste, we could skip the wetting step, but this is not possible. The paper is not pliable enough until it has been wet. So, Charity continued to wet the wallpaper while I applied it to the pasted wall. Also, Charity said it seemed to work best if she kind of dabbed the sponge on the paper instead of trying to run the sponge along the paper as we originally did in our video.
Even though we had many breaks in our vertical sections because of the pantry shelves, we still applied the paper from ceiling to floor before moving on to the next strip of paper to the right.
I was a little nervous to hang the adjacent strip of paper. I worried about my ability to match up the pattern as well as placing the left edge of my new strip perfectly against the right edge of the already placed paper. But this actually was fairly easy. Our pattern was VERY specific. We had to match up words, boxes, lines and/or images. It wasn’t like a repeating floral pattern where it’s basically the same image over and over. So, before cutting the new strip, we eyed the pattern of what was already placed to make sure that we had the matching pattern near the top of the next strip. Sometimes we had to cut off some excess to make it more manageable. For instance, if the pattern that needed to be matched was like 12″ down the strip, we’d cut off about 10″ before hanging it to make it a more manageable size while hanging. We’d then save that extra part we cut off to use somewhere else. This worked for us because we had smaller spaces in-between the shelves that could use these smaller cut strips.
Even though you may match up the top pattern pretty easily, you want to make sure your pattern matches the whole way down your strip. The wallpaper we used had an interesting amount of give and stretch to it. I found that sometimes I stretched the paper too much while holding it against the wall, which stretched the pattern so it wouldn’t line up perfectly with the less stretched (or differently stretched) piece of paper we were matching it to. But you have a little time where you can adjust the paper on the wall before it becomes too stuck. Use this time as soon as you place it to make sure you match up the pattern on the left edge before smoothing it against the wall. This also ensures that your strips stay straight, as they will be flush with the first piece which you placed against your level vertical line. Once you get the hang of this, hanging these inner strips (as opposed to corner strips) goes fairly quickly.
When we got to our second corner, we had a bit of a problem. My husband had drawn the line 20″ away from the corner on the new wall, as the paper told us to do, BUT, the pattern of the paper to be hung did not come anywhere close to matching the pattern of the piece that ended on the left side of the second corner. After A LOT of measuring and contemplating, we decided we wanted to line up the pattern that met in the corner. This required us to draw a new level vertical line that was 13″ away from the corner. My husband wasn’t home to do this for us, so I had to do it, which made me nervous, but it was easier than I thought. Another challenge that arose from applying a 20.5″ wide strip of paper only 13″ away from the corner was that we were left with a lot of excess paper on the adjacent corner. We had matched the pattern really well, however, so it overlapped the already placed wallpaper nearly perfectly. We debated just letting that excess paper be pasted down on top of the already placed wallpaper, but in the end, decided to score it down the corner and cut it off. I just wasn’t sure how well the paper would adhere to the paper and didn’t want it to fall down at some future point or affect the paper beneath it. The second corner was probably the most difficult part of our wallpapering adventure. It pushed the limits of our sleep-deprived mom brains. But after figuring it out, the rest of the wall (besides the last bottom corner where we ran out of paper) went up really quickly and easily.
After finishing the wallpaper, I admired it for a while before putting the pantry contents into place. I was also too tired to restock the pantry, and I wasn’t sure where I wanted all of my new containers to go. After sufficient rest and playing around with content placement for a while, I finally had everything put into place. The last step was having Charity write the names on the chalkboard labels to put on all the containers. Her handwriting should be made into a font. Mine is like a pubescent boy’s handwriting, according to my husband. After everything was labeled and organized, I couldn’t have been happier. I absolutely love how my pantry looks, but I also love how well it has worked for us to stay organized. It has honestly helped with our grocery shopping. We can just stand in the pantry doorway and see everything that needs to be replaced. No more hunting around for things or buying too much of something because we didn’t know we already had it somewhere.
My pantry has truly reached perfection. It was quite a labor and time intensive project, but it was definitely worth it to me. As I write this, it has been exactly 2 months since I began working on my pantry and it is still PANTRY PERFECT!

I would love to hear your thoughts on my pantry makeover! And I would love to see pics of organized places in your home and get tips on what has worked for you. I think I’d like to tackle my laundry room next. Still trying to figure out the best system for it.
The Container Store, if you read this, I have parody in mind just for you regarding my laundry organization!
Affiliate Links

Pink Mason Jar Ceramic Cookie Jar

Oggi 9322 5-Piece Acrylic Canister Set with Airtight Clamp Lids-Food Storage Container

Oggi 62-Ounce Copper Plated Stainless Steel Canister with Clear Arylic Lid and Locking Clamp

Oggi 47-Ounce Copper Plated Stainless Steel Canister with Clear Arylic Lid and Locking Clamp

Rubbermaid 1.5 gallon Cereal/Snack Storage Container (3 Pack), Blue/Green/Purple

Oggi Jumbo Acrylic Airtight Canister with Clamp, 150-Ounce


Rust-Oleum Painter’s Touch Ultra Cover Gloss Aerosol Paint, 12 oz, Ocean Mist
![]()
Husky 2.4 in. Compact Folding Lock-Back Utility Knife-Red

Mintcraft 38800 Plastic Wallpaper Smoother

Stanley 33-279 Max English Tape, 1-1/8 Inch X 25′

Stanley 42-324 24-Inch I-Beam 180 Level


Wooster Brush 5221-3 Silver Tip Angle Sash Paintbrush, 3-Inch